Thursday, November 23, 2017

Brussels Sprouts Gratin

Happy Thanksgiving! With family coming over, Dad put me in charge of providing the vegetable dish, and Wanda sent me a recipe for Brussels Sprouts Gratin - so I thought they'd be perfect to try. I enlisted the help of my nephew, and together we made a pretty good tasting dish.

Brussels Sprouts Gratin

Ingredients:
  • 16 oz brussels sprouts, trimmed of outer leaves and sliced in half
  • 1/4 tsp kosher salt
  • black pepper, to taste
  • olive oil spray
  • 1/2 tbsp butter
  • 1/3 cup chopped shallots
  • 2 tsp all purpose flour (or gluten free flour for GF)
  • 3/4 cup fat free milk
  • 1/4 tsp kosher salt
  • 1 tsp fresh thyme
  • 1 tbsp grated parmesan cheese
  • 2 oz grated Gruyere cheese, divided
Directions:
  1. Preheat oven to 400°F. Spray an 8"x12" gratin dish or casserole with olive oil. Add the brussels sprouts and season with salt and pepper. Spray more olive oil over the brussels and place in the lower third of the oven. Bake 15 minutes, toss and bake an additional 10 minutes.
  2. Meanwhile, heat a medium nonstick pan over medium heat. Add butter and let it melt, add the shallots and cook until softened, about 4 to 5 minutes. Sprinkle the flour over the shallots to make a roux, whisking for 1 to 2 minutes. Add the milk and stir with a wooden spoon until the roux is incorporated into the milk. Cook over medium-low heat for about 4 minutes, stirring, until the sauce thickens. Add fresh thyme, parmesan and half of the grated Gruyere cheese into the white sauce and stir until the cheese is melted and incorporated into the sauce.
  3. Pour over the brussels sprouts, and top with the remaining cheese. Bake for 15 minutes until top is lightly browned and bubbly.
The grocery store was out of Gruyere cheese, so on a recommendation that I found on the Internet, we used Jarlsberg. As I mentioned, I think it was a good dish, but the best part was the bonding time with my nephew!

Saturday, November 18, 2017

Recliner Pillows

Well, after eight months of working on them on and off, I've finally completed the pillows for the recliners.

They are very simple, but I kept putting off finishing them because we wanted to put zippers in them - something I've never tackled before. I, of course, am concerned with all of the imperfections, but Tom is pleased, so I'm glad they're done.

Tuesday, October 31, 2017

Halloween Potluck

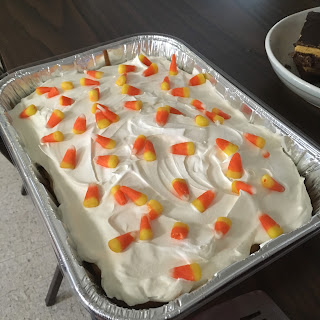
We had a potluck at work today, and these were my contributions.


I made regular old deviled eggs, but decorated them with spiders made from cut up black olives.


This was veggies and dip.


And finally, I made Candy Corn Poke Cake.
Candy Corn Poke Cake

Ingredients
  • one box of white cake mix plus the fixn's needed to make it
  • food coloring
  • 14 oz sweetened condensed milk
  • whipped topping
  • candy corn
Instructions
  1. Make the cake batter as directed. Then divide it into three equal parts. Color one yellow, one orange, and leave one alone. Make sure you add enough to make it really vibrant.
  2. Spray the bottom of a 9 x 13 pan . Spread the yellow layer evenly across the bottom, and then stick it in the freezer (make sure it is sitting flat). Leave it in there for 20 minutes.
  3. As soon as you pull it out, very carefully add the orange layer, pouring it as evenly as possible around the pan, and gently spreading it out to cover the yellow. Put it back in the freezer for 20 more minutes.
  4. Preheat your oven to the temperature specified on the cake mix.
  5. Taking out the cake batter pan, again, carefully spread the white layer. Let it sit on top of the preheating oven for at least 30 minutes.
  6. Bake according to package directions. As soon as the cake comes out of the oven, poke holes throughout the cake with the end of a wooden spoon. Pour the sweetened condensed milk evenly over the cake, making sure to fill each hole.
  7. Refrigerate overnight. Right before serving, top with whipped topping, candy corn, and enjoy!
  8. **Note, the candy corn tends to bleed into the whip cream, so if you aren't going to be serving it right away, you might want to wait to top it
I think the hardest part for me was creating the colors, that food coloring is hard to work with.

Wednesday, July 12, 2017

R2-D2 Diaper Cake

Today we held a baby shower for Alyson, and had a Star Wars theme, since she's a big fan. For my part, I got to make the "Bantha Bites" and I made the Cuban Sliders, which were a request (later titled "Hans Hoagies"). For a gift, I decided on an R2-D2 diaper cake, but since most of the items I was able to source were green, it's more like an R2-A6 diaper cake.

Here's what I had to buy to make the cake:

  • 1 white plastic colander
  • 1 box of 120 size 1 diapers
  • 2 plastic utensils
  • 2 bottle brushes
  • 2 boxes of wipes
  • 1 spool of white ribbon
This is how I assembled the cake:
  1. I rolled up three layers of diapers, using 35 diapers for each layer. Each layer was wrapped with a length of white ribbon, and secured with some pins.
  2. The boxes of wipes were turned upside-down, and placed where the "feet" should be. A cardboard circle was placed on top of the wipes so that the first layer of diapers would have a flat surface to sit on.
  3. The layers were stacked on the cardboard circle/feet, ensuring that the layers were turned so that the pins securing the ribbons were in the back.
  4. The colander was turned upside down and placed on top of the top layer of diapers.
  5. The bottle brushes were taped to the boxes of wipes and the handles of the colander. The containers for the bottle brushes weren't actually tall enough to reach the handles of the colander, so there is some empty space there.
  6. The utensils were taped to the lop layer of diapers.
  7. Using Google Images, I looked up "r2d2 printable pattern" and chose one that I liked. I printed it out, cut out the individual elements and taped them onto the cake.
She loved it!

Saturday, June 10, 2017

Diaper Jeep

One of my former co-workers from the Tidewater is in town to visit her family, and they decided to throw her a baby shower. My contribution was a diaper Jeep.

I am pleased with the way it turned out, especially since I'm not crazy about the proportions of the Jeep in the only tutorial I could find on-line.

Tuesday, April 18, 2017

Community Art Quilt Blocks

A few months ago, I was volunteered by the Tidewater management to create quilt blocks for the Havre de Grace library's Community Art Quilt, which was being created to celebrate the one year anniversary of the new library building. Local businesses and individuals would create the blocks with the theme "Why I Love Havre de Grace." I made two blocks for the Tidewater's entries.

Both blocks were supposed to be representations of views from the deck of the restaurant; one looking to the left at the railroad bridge and the other looking to the right, down the Susquehanna River at the "sailboat races." Although neither of them won I think they both turned out well, and I'm excited to see how they're incorporated on the finished quilt.

Tuesday, February 28, 2017

Silica Excellence Award

This morning, I was one of several people awarded the Silica Excellence Award for New Business Development.

It's very nice to have your hard work recognized.