

From where I was, it looked like the rainbow ended at the Ravens Practice Facility - right where I was heading! Since today's game determined the fate of the Ravens and their chances of going to the Playoffs, I thought it was quite an omen.
As usual, the performance of the Ravens wasn't stellar. With such an important game on the line, they were losing going into the fourth quarter, and then, wouldn't you know it, they started scoring, and eventually beat Cleveland, 20-10. As luck would have it, San Diego wasn't playing at their best against Kansas City, and with their loss and our win, we were able to get a Wild Card berth.
As for the band, we only did pre-game, where we performed the half-time show that we had planned for today's game. It was a medley of #1 songs, which included "Black Widow," "Shake it Off," "Blame," "Take Me to Church" and "Animals." Half-time was Frisbee Dogs. They were cute.
And here's the flute section after our last home game this season!


Applesauce cakeTom said it was good, but a little dry. He recommended either adding more applesauce, or baking it for less time. He also noted that the raisins kind of sunk to the bottom. I think that's because I didn't chop them up. I tried it and thought it was good, but I didn't have any expectations.
- 2 1/2 cups sifted all-purpose flour
- 1 3/4 cups sugar
- 1/4 teaspoon baking powder
- 1 1/2 teaspoon baking soda
- 1 1/2 teaspoon salt
- 1 teaspoon cinnamon
- 1/2 teaspoon cloves
- 1/2 teaspoon allspice
- 1/2 teaspoon nutmeg
- 1/2 cup shortening
- 1 15-ounce can unsweetened applesauce (1 3/4 cups)
- 3 eggs
- 1 cup seedless raisins, chopped
- 1 cup walnuts, finely chopped (optional)
- Preheat oven to 350 degrees.
- Grease well and flour 13-by-9-inch baking pan.
- Sift flour, sugar, baking powder, baking soda, salt and spices into a large mixing bowl of electric mixer. Add shortening and applesauce; beat 1 minute at low speed, just to combine.
- At medium speed, beat 2 minutes, constantly cleaning side of bowl with rubber scraper and guiding batter into beaters. Add eggs and beat 2 minutes more.
- Combine raisins and walnuts (if using) and gently fold into batter.
- Turn batter into prepared pan; bake for 45 minutes, or until cake tester inserted in center comes out clean.
- Let cake cool completely in pan on wire rack.
- Frost as desired.

Eggnog-Frosted Nutmeg Sugar CookiesAs expected, these turned out really well. They went pretty fast, and got lots of compliments.
IngredientsDirections
- 1/2 vanilla bean, split in half lengthwise, or 2 teaspoons vanilla
- 1 1/4 cups butter, softened
- 1 cup sugar
- 1 1/2 teaspoons baking powder
- 1 freshly grated nutmeg or 1/2 teaspoon ground nutmeg
- 1/2 teaspoon salt
- 1 egg
- 1 tablespoon dairy or canned eggnog
- 3 1/4 cups all-purpose flour
- Eggnog Icing
- Coarse sugar (optional)
Eggnog Icing
- Using the tip of a sharp knife, scrape pulp from vanilla bean; set aside. In a large bowl, beat butter with an electric mixer on medium to high speed for 30 seconds. Add sugar, baking powder, nutmeg, and salt. Beat until combined, scraping bowl occasionally. Beat in egg, eggnog, and vanilla pulp or vanilla until combined. Beat in as much of the flour as you can with the mixer. Using a wooden spoon, stir in any remaining flour. Divide dough in half. Cover and chill 1 hour or until dough is easy to handle.
- Preheat oven to 375 degrees F. On a lightly floured surface, roll out one of the dough portions to 1/4 inch thick. Using a fluted round 3-inch cookie cutter, cut out dough. Place dough rounds 1 inch apart on an ungreased cookie sheet. Bake in the preheated oven for 8 to 10 minutes or until edges are firm and bottoms are just lightly browned. Transfer cookies to a wire rack; let cool. Repeat with other dough portion. Spread cookies with Eggnog Icing. If desired, sprinkle with coarse sugar. Let icing dry. Makes about 24 cookies.
IngredientsDirections
- 3 cups powdered sugar
- 1/2 teaspoon vanilla
- 3 tablespoons dairy or canned eggnog or milk
- In a medium bowl, stir together powdered sugar and vanilla. Stir in enough dairy or canned eggnog or milk to make an icing of spreading consistency.

I think I'll get some good use out of this gift!

Compared to the Fleece Fringe Scarves, these were pretty labor intensive, needing the sewing machine a LOT more. I DO love them, though, they just look sew classy! Ha, ha, pun intended!

Red Velvet Oreo Truffle Chocolate Cake
IngredientsInstructions
- 1 box Duncan Hines Red Velvet Cake Mix
- 1 1/4 cups water
- 1/3 cup oil
- 3 large eggs
- 1 cup sour cream
- 1 3.4 oz package Jell-O Instant Pudding (White Chocolate)
- 1 package Oreo cookies
- 1 8-ounce package cream cheese
- 1/2 cup butter
- 1 1/2 cups sugar
- 1/3 cup evaporated milk
- 1/2 cup chocolate chips (extra for garnish)
- Preheat oven to 350 degrees F.
- Grease sides and bottom of pans.
- Blend together cake mix, oil, water, eggs, sour cream, and pudding mix. Beat at low speed (for 30 seconds).
- Bake for 30-35 minutes (or until a toothpick inserted comes out clean). Baking time may vary based on size of pan.
- Crush Oreo cookies (best with food processor) and stir in cream cheese until fully blended. This will be a very thick "filling".
- After cake has cooled, spread Oreo filling between layers as you stack. Again, it's very thick so you might have to use your hands to help spread it onto cake.
- In a saucepan over medium heat, melt together butter, sugar, and evaporated milk.
- Bring to a rolling boil for 1 minute and stir in chocolate chips.
- Remove from heat and pour over cake (fudge sets up quickly) and garnish with chocolate chips!
- Enjoy!
It was delicious, but very rich! While the cake cooled overnight, I tried to make the middle layer easy to work with by putting it in a cake pan and pressing it out, rather than doing it on the cake, where I surely would have messed it up. I think it turned out to be a good idea, but perhaps some wax paper in the bottom of the pan would have helped it be an excellent idea.

4 Cheese Spinach DipThis dish was easy to make and was delicious.
IngredientsCooking instructions
- 8 Ounce of cream cheese (room temp)
- 1 Teaspoon of garlic powder
- 1/3 Cup freshly grated Parmesan cheese
- 2 Tablespoon freshly grated Romano cheese
- 2 Tablespoon very finely chopped red bell pepper
- 2 green onion (scallion) white and green finely chopped
- 1 Cup of wilted fresh baby spinach, squeezed dry and chopped (or frozen and thawed)
- 1/2 Cup grated medium Cheddar cheese
- a pinch of cayenne and paprika
- Preheat oven to 400 degrees F.
- Mix cream cheese, garlic powder, parmesan, romano, cayenne and paprika with hand or stand mixer on medium until softened and well mixed.
- Add the red peppers and the scallions and mix on med-low until just incorporated.
- Add spinach and mix on low until just incorporated.
- Transfer mixture to a small ovenproof dish and top with cheddar. Bake for 15 - 18 minutes or until bubbling around the edges.
- Remove from oven and allow to set for 5 - 7 minutes before serving. Serve with fried or baked pita wedges and tortilla chips (nachos).

Easy Three-Ingredient Jalapeno PoppersAt first bite, I was afraid that I was going to be disappointed in the spicy arena. But, after a few more bites, whew! Quite successful, and tasty.
IngredientsDirections
- 1 can (8 oz) Pillsbury™ refrigerated crescent dinner rolls
- 8 small jalapeño chiles
- 1 container (8 oz) garden vegetable cream cheese spread
- Heat oven to 375°F. Separate dough into 8 triangles. Cut each triangle lengthwise into 2 narrow triangles.
- Cut jalapeño chiles in half lengthwise; remove seeds. Spoon cream cheese mixture into chile halves.
- Place 1 stuffed chile half on shortest side of each triangle. Roll up, starting at shortest side of triangle and rolling to opposite point; place point side down on ungreased cookie sheet.
- Bake 14 to 18 minutes or until crescents are deep golden brown.

Jalapeno Popper Deviled EggsThese turned out well, but not as spicy as I'd hoped. If I try these again, I'll use the pickled jalapenos, which are a little spicier.
ingredientsdirections
- 6 hard boiled eggs, peeled
- 2 tablespoons mayonnaise or Greek yogurt
- 3 tablespoons cream cheese, whipped
- 3 tablespoons cheddar, shredded finely
- 1/4 cup jalapenos (pickled, fresh or roasted), diced finely
- 1/4 cup bacon, cooked and crumbled finely
- 6 tablespoons cheddar, shredded finely
- Cut the eggs in half, scoop the yolks out, mash the yolks and mix with the mayonnaise, cream cheese, cheddar, jalapenos and bacon and place a tablespoon of the mixture back into the holes left by the yolks in the eggs.
- Sprinkle on remaining cheddar, place on a baking sheet and broil until the cheese has melted.

Bacon Jalapeno Popper QuicheIt was delicious. I got a lot of compliments, and one person wanted the recipe (the ultimate compliment).
IngredientsInstructions
- 9 inch frozen pie crust
- ½ cup cream cheese, room temperature
- 2 jalapenos, diced (deseed for less heat)
- 1 jalapeno, sliced into rounds (for top) (I mostly deseeded these as well)
- 3 slices bacon, cooked crisp and coarsely chopped
- ½ cup whipping cream
- ½ cup half-and-half
- 5 large eggs
- 1 teaspoon paprika
- salt
- ½ cup shredded cheddar cheese
- optional-light sour cream
- Preheat oven to 400 degrees F
- Thaw the frozen crust for 10 minutes, then prick the crust all over the bottom and sides with a fork to make tiny holes
- Bake it for 10 minutes
- Remove the crust and lower the oven temperature to 350 degrees
- While the crust is hot, spread the cream cheese all over the bottom as evenly as possible
- Sprinkle the diced jalapenos over the cream cheese (the rounds are for garnish later on)
- Put the cream and half-and-half into a small pot and put it over medium heat about 5 minutes or until tiny bubbles appear around the edges. Scald (where you bring it to just under the boiling point) until very hot, but not boiling
- Beat the eggs together in a bowl
- Add the hot cream mixture to the eggs, whisking constantly to combine
- Add the paprika, salt and bacon
- Pour into the crust and bake for 30 minutes
- Remove from oven, arrange the jalapeno slices on top, sprinkle with cheese and bake until the cheese has melted and turned golden brown, about 15-20 minutes (the original recipe said 12-15 minutes, but I did closer to 20. Check at 12 minutes, every couple of minutes)
- Cool slightly before serving
- Optional-serve with light sour cream

Sausage Breakfast CupsI thought these turned out really well. They were super easy, and in order to get the ingredients, there was enough excess to make it again.
IngredientsSteps
- 1/3 lb bulk pork sausage
- 1 tablespoon Pillsbury BEST® all-purpose flour
- 3/4 cup milk
- 1/8 teaspoon salt
- 1/2 teaspoon coarse ground black pepper
- 2 LAND O LAKES® Eggs
- 1 tablespoon half-and-half
- 1/2 teaspoon dried parsley flakes
- 1/8 teaspoon California-style garlic salt or garlic salt
- 1 tablespoon LAND O LAKES® Butter
- 1/2 cup frozen southern-style cubed hash-brown potatoes (from 32-oz bag)
- 1 can (16.3 oz) Pillsbury® Grands!® Homestyle refrigerated buttermilk biscuits
- Fresh parsley, if desired
- Heat oven to 375°F. In 10-inch nonstick skillet, cook sausage over medium heat, stirring frequently, until thoroughly cooked. Drain; return sausage to skillet. Stir flour into sausage. Over medium heat, gradually add milk, cooking and stirring until bubbly and thickened. Stir in salt and 1/4 teaspoon of the pepper. Remove from heat; set aside.
- In small bowl, beat eggs, half-and-half, parsley flakes, garlic salt and remaining 1/4 teaspoon pepper with wire whisk until well blended; set aside.
- In another 10-inch nonstick skillet, melt 1/2 tablespoon of the butter over medium-high heat. Stir in potatoes. Cook about 5 minutes, stirring frequently, until lightly browned and almost fork-tender. Reduce heat to medium-low; stir remaining 1/2 tablespoon butter into potatoes. Pour egg mixture over potatoes; cook, folding potatoes into egg mixture, just until firm and moist. Remove from heat; set aside.
- Separate dough into 8 biscuits; place each biscuit in ungreased 2 3/4x1 1/4-inch muffin cup. Firmly press dough in bottom and up side of each cup, forming 1/2-inch rim. Spoon potato mixture evenly into dough-lined cups. Spoon sausage mixture evenly over potato mixture (cups will be very full).
- Bake 17 to 22 minutes or until edges of biscuits are deep golden brown. Cool 5 minutes. Remove from muffin cups. If desired, garnish each with fresh parsley.

Chocolate Eclair CakeWhen I attended Tonya's bridal shower, I tried this cake. Having been a fan of eclairs for as long as I can remember, I thought it was heavenly! Part of the shower was bringing recipes, and as luck would have it, Aunt Diane brought her recipe for this cake - so I "stole" a copy.
IngredientsDirections
- 3 cups milk
- 1 16-oz box graham crackers
- 2 4-oz boxes Instant vanilla pudding
- 1 8-oz container Cool Whip
- 1 can fudge frosting
- Mix pudding with milk, fold in Cool Whip.
- Layer 9x13 pan with layer of golden grahams, pour in half of pudding mixture, layer of crackers, rest of pudding mixture, layer of crackers.
- Melt frosting 30 seconds in microwave and pour over cake.
- Refrigerate for about 3 hours before serving.

It was relatively successful. We had one no-show, but an extra flute player (she left to go to college, but is back for the holiday), so I gave her my cookies. It's sad, but the best solution for my waistline.

5-Ingredient Pumpkin CookiesSo, Tom liked the cookie - pre-frosting. I thought it was good both ways. It does make more cookies than I thought it would, and I have extra canned pumpkin and frosting - a good reason to make more cookies!
IngredientsDirections
- 1 roll Pillsbury™ refrigerated sugar cookie dough
- 2 tablespoons pumpkin pie spice
- 1/2 cup canned pumpkin (not pumpkin pie mix)
- 1 package (8 oz) cream cheese
- 1 cup powdered sugar
- Heat oven to 350°F. In large bowl, break cookie dough into small chunks. Add pumpkin pie spice and pumpkin. Beat with electric mixer on medium speed until well blended.
- Drop dough by rounded tablespoonfuls about 2 inches apart on 2 ungreased cookie sheets.
- Bake 14 to 16 minutes. Cool on pan 5 minutes; remove to cooling rack to cool completely, about 30 minutes.
- Meanwhile, unwrap cream cheese. Place in medium microwavable bowl. Microwave uncovered on High 1 to 2 minutes, stirring every 30 seconds, until softened. Stir in powdered sugar until smooth. Spread on cookies.

Peppermint BlossomsI was quite surprised to see that the Kisses were melting, so I would advise to ammend the directions in one of these ways:
IngredientsDirections
- 1 roll (30 oz) Pillsbury™ refrigerated peppermint cookies
- 6 tablespoons sugar
- 72 Hershey®’s Kisses® Brand candy cane flavored candies, unwrapped
- Heat oven to 350°F.
- In bowl, break up cookie dough. Stir or knead in 1/2 cup all-purpose flour until well blended. Shape dough into 72 (1-inch) balls. Roll balls in sugar in shallow bowl. On ungreased cookie sheets, place balls 2 inches apart. Bake 10 to 14 minutes or until edges are golden brown.
- After removing from oven, immediately top each cookie with 1 candy, pressing down firmly so cookie cracks around edge. Remove from cookie sheets to cooling racks. Cool completely before storing.
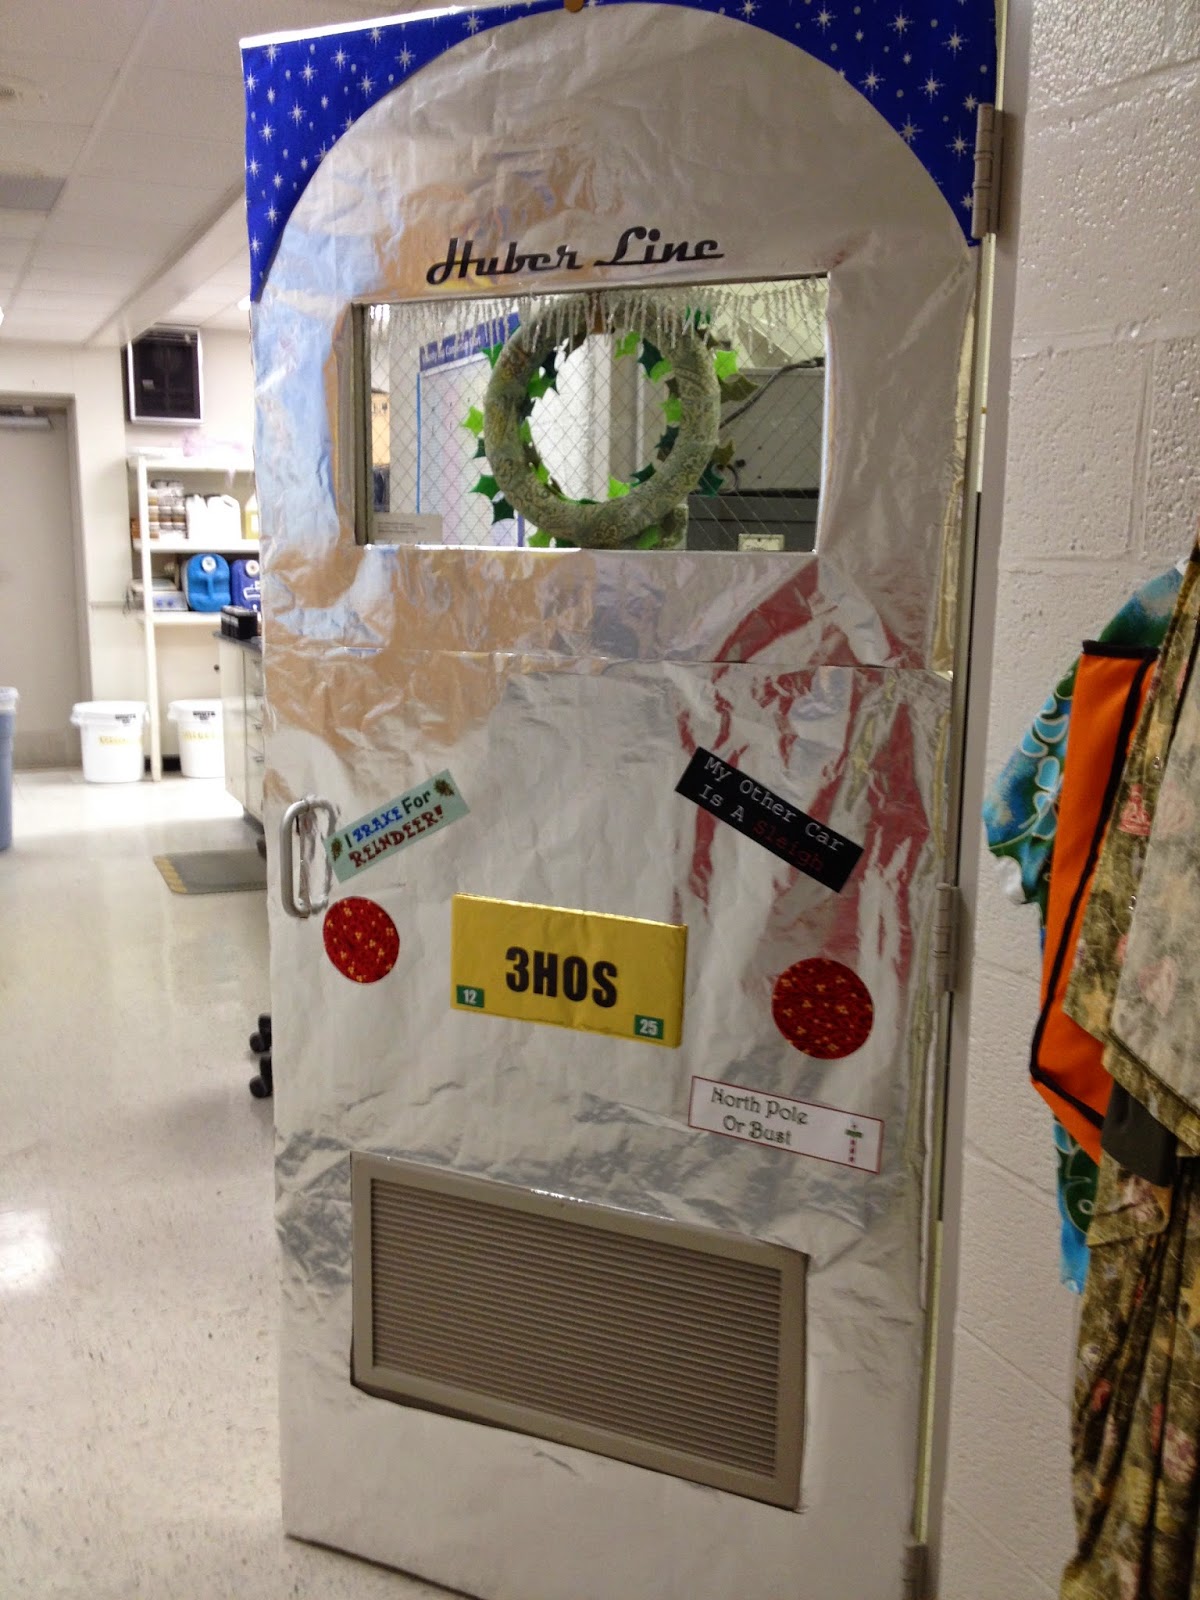
Okay, just in case you don't get it (and it seems like about half of my co-workers don't get it, either), it's the back of an AirStream camper or VW bus. I saw a similar idea on the internet, and thought that with the window and vent that needed to stay uncovered, it would be super fun! Just in case you can't read the bumper stickers, they say "I Brake for Reindeer," "North Pole or Bust," and "My Other Car is a Sleigh." And the license plate reads "3HOS" - for Ho! Ho! Ho! (get your minds out of the gutter).

I used shiny wrapping paper for the origami, and blue wrapping paper with stars for the background. I think it turned out well.

I did not have a scallop-edged ruler, so I made a template using a pint glass and a piece of paper. I was surprised how important the double-knot tension is. If you don't tighten the knots enough, you don't get the ruffle effect and the scarf lies kind of flat, but if you tighten them too much, the ruffles flair out like butterfly wings, making the scarf awkward to wear. I had to take the knots out of one of the scarves, and reknot it, since the it was so flat. Another point to consider, the scarves lost a lot of length with the knots - they started around 60 inches long, but ended up closer to 48 inches.

Jalapeno Popper Chicken SoupI made a slight variation (as is evident from the title of my blog post), I used turkey and turkey broth - leftovers from Thanksgiving dinner. It was delicious! Tom won't be able to touch the bowl it's in, it's that spicy. For slow cooker directions and other options, check out the link above.
IngredientsDirections
- 4 slices bacon, cut into 1 inch pieces
- 1 tablespoon oil
- 1 onion, diced
- 4 jalapeno peppers, diced
- 2 cloves garlic, chopped
- 4 cups chicken broth or vegetable broth
- 2 cups chicken, cooked and diced or shredded
- 1 (15 ounce) can white beans
- salt and pepper to taste
- 1 cup corn
- 4 ounces cream cheese, room temperature
- 1 cup aged cheddar cheese, shredded
- Cook the bacon in a large sauce pan until crispy, set aside on paper towels to drain and pour off the excess grease.
- Heat the oil in the pan over medium heat, add onion and jalapeno peppers and cook until tender, about 5-7 minutes.
- Add the garlic and cook until fragrant, about a minute.
- Add the broth, bacon, chicken and beans and simmer for 15 minutes, seasoning with salt and pepper to taste.
- Add the corn, cream cheese and cheddar cheese and stir it in until the cheeses melt.

I only did half of the tree because our safety regulations prohibit us from covering the window or vent on the door, and stuff doesn't stick well to the walls. I like how it turned out.

We had twelve participants, and there were so many delicious cookies to sample, that I think I went into sugar shock for a short period of time! Each participant went home with a fabulous bag of goodies.

Now, it's time to move on the phase two of this project - which is kind of a surprise. I threw the idea out to Mel about taking pictures of the cookies and getting their recipes, then putting together a photo book for each of the participants as a Christmas (or soon thereafter) gift. She's all for it, so we're going to get together and work on that next.

Thanksgiving Leftover CasseroleIn a small casserole dish, I layered turkey, cranberry sauce, mashed potatoes, gravy and stuffing, and baked it for 30 minutes at 400°C. Yummy!
IngredientsInstructions
- 2-3 c. leftover turkey, shredded
- 1½ c. cranberry sauce
- 3-4 c. leftover mashed potatoes
- 2 c. corn
- 1-2 c. turkey gravy
- ⅓ c. milk
- 4-5 c. leftover stuffing
- ¼ - ⅓ c. chicken broth (or to taste)
- Preheat oven to 400-degrees.
- Combine turkey and cranberry sauce and spread evenly on the bottom of a 9x13 glass baking dish.
- Evenly press on leftover mashed potatoes and sprinkle corn over the top.
- Mix together milk and leftover gravy and spread evenly over potatoes and corn.
- Sprinkle on leftover stuffing and lightly drizzle chicken broth over the top (this will keep the stuffing from drying out).
- Cover with tin foil and bake at 400-degrees for appx. 35-40 minutes or until heated through.

Wreath CookiesNow, my recipe is slightly different (it's an old family recipe), but this seems to be the official one - straight off of the Kellogg's web site.
INGREDIENTSDIRECTIONS
- 1/3 cup margarine or butter
- 1 package (10 oz. about 40) regular marshmallows OR 4 cups miniature marshmallows
- 1 teaspoon green food coloring
- 6 cups Kellogg's Corn Flakes® cereal OR 6 cups Kellogg's Frosted Flakes® cereal
- Red cinnamon candies
- Prepared vanilla frosting
- Melt margarine in large saucepan over low heat. Add marshmallows and stir until completely melted. Remove from heat. Stir in food coloring.
- Add KELLOGG'S CORN FLAKES cereal. Stir until well coated.
- Portion warm cereal mixture evenly by using a 1/4 cup dry measure coated with cooking spray. Using sprayed fingers, quickly shape into individual wreaths. Dot with cinnamon candies, using prepared frosting to hold candies in place. Store in single layer in airtight container.

They were super simple, with minimal use of the sewing machine. The hardest part was cutting the fleece so that it was straight, and I still don't think I got it right. Luckily, the fringes hide the imperfections. Oh, and my hand is TIRED from making so many snips!

Gingerbread PinwheelsSomehow, Tom got a hold of a couple of these cookies and ate them. He said they were delicious. I'll reserve judgment until Monday.
IngredientsDirections
- 1 roll (30 oz) Pillsbury™ refrigerated gingerbread cookies
- 1 roll (30 oz) Pillsbury™ refrigerated sugar cookies
- 1 tablespoon sugar
- Cut each roll of dough in half. Wrap and refrigerate one half of each dough for another use.
- Place 17x12-inch sheet of waxed paper on cookie sheet. Cut remaining gingerbread cookie dough in half lengthwise. Arrange halves, side by side, on cookie sheet. Top with second sheet of waxed paper. Roll dough to form 14x9-inch rectangle. Freeze 5 minutes.
- Repeat on work surface with sheets of waxed paper and remaining sugar cookie dough. Freeze 5 minutes. Remove top sheet of waxed paper. Lifting dough with waxed paper, turn sugar cookie rectangle over onto gingerbread rectangle. Gently pat doughs together. Refrigerate 15 minutes.
- Remove waxed paper from top of dough. Using remaining waxed paper, and starting with 1 long side, roll up stacked dough, without rolling paper into roll. Wrap roll of dough securely with waxed paper. Freeze about 45 minutes or until very firm.
- Heat oven to 350°F. Unwrap dough; cut into 4 equal rolls. Work with 1 roll at a time; keep remaining 3 rolls in freezer until ready to slice. Cut each roll into 13 or 14 (1/4-inch) slices. On ungreased cookie sheets, place slices 2 inches apart, reshaping into rounds as necessary. Sprinkle each cookie with sugar.
- Bake 10 to 12 minutes or until edges are golden brown. Cool 2 minutes; remove from cookie sheets to cooling racks.

Peppermint Crunch Sugar CookiesNeither me nor Tom have tried them out, yet, but the cookie exchange on Monday will be the big day. I can't wait to see how they turn out.
IngredientsDirections
- 1 roll (16.5 oz) Pillsbury™ refrigerated sugar cookies
- 1 1/2 cups white vanilla baking chips or semisweet chocolate chips
- 8 round hard peppermint candies, crushed (1/4 cup)
- Heat oven to 350°F. In large bowl, break up cookie dough. Stir or knead in 1/4 cup all-purpose flour until well blended. Shape dough into 36 (1-inch) balls. Bake 10 to 14 minutes or until edges are golden brown. Cool 1 minute; remove from cookie sheets to cooling rack. Cool completely, about 5 minutes.
- In small microwavable bowl, microwave vanilla chips and 1 tablespoon vegetable oil uncovered on Medium (50%) 2 to 3 minutes, stirring once halfway through microwaving, until melted. Stir until smooth.
- Dip half of each cookie into melted chips mixture, allowing excess to drip off; place on waxed or parchment paper-lined cookie sheets. Sprinkle each with about 1/2 teaspoon crushed candy. Let stand until set.

Wild Turkey Ball BrowniesI'm waiting until the actual cookie swap to try them out, but what do you think, next time try it with Fireball Whiskey?
- 10 ounces Nilla Wafers, crushed
- 1 cup pecans, ground
- 1/2 cup powdered sugar
- 6 ounces chocolate chips
- 1/2 cup Wild Turkey
- 3 tablespoons light corn syrup

Eggplant and Zucchini Gratin (simple version of ratatouille)I must say it was delicious. The picture doesn't show the wonderful colors of the various vegetables that I used. Tom didn't try it, so there's no report from him.
From: Julia and Jacques Cooking At Home
Yield 6-8 servings
For bread-crumb topping
- 1/2 cup or so olive oil
- 1 large or 2 medium eggplants
- 1 tablespoon herbes de Provence
- 1 teaspoon salt
- 2 medium zucchini, about 1 pound total
- 3 or 4 ripe tomatoes, about 1 pound total
- 1/2 teaspoon freshly ground pepper
- 1/2 cup or so fresh bread crumbs, not too finely ground
- 1/3 cup or so freshly grated Parmesan cheese
Note: gratin can be assembled (don't add oil until baking), covered and refrigerated for several hours. Preheat oven and drizzle on last olive oil just before baking.
- Preparing the vegetables
Arrange the rack on the lower-middle level of the oven and preheat to 400. Smear a baking sheet generously with 1/3 cup of the olive oil. Trim off ends of eggplant and slice on the diagonal into ovals 1/2" thick. One at a time, lay the slices on the sheet, press to coat lightly with oil and turn them over. Arrange the slices, oiled side up, in a single layer and sprinkle on 1/2 teaspoon each of salt and herbs de Provence. Bake for about 15 minutes until the eggplant slices are soft and somewhat shriveled; allow to cool briefly. Leave the oven on if you will be baking the gratin right away. Meanwhile, trim the ends off the zucchini and cut lengthwise into slices no more than 1/4" thick. Salt the zucchini and let it sit for about 15 minutes then wipe the salt & moisture off - otherwise your casserole can be too watery. Core the tomatoes and cut into slices 1/4" thick. Spread out the slices and sprinkle them lightly with 1/4 teaspoon of freshly ground pepper.- Assembling the gratin
Film baking dish well with 1 teaspoon olive oil and sprinkle a teaspoon of the dried herbs all over the bottom. Lay one or two eggplant slices, lengthwise, against a narrow side of the dish. Arrange a long slice or two of zucchini in from of the eggplant, then place 2 or 3 tomato slices in front of the zucchine. Repeat until the pan is full of alternating rows of eggplant, zucchini, and tomatoes. Arrange each new row of slices so the colorful top edges of the previous row are still visible.- Topping and baking
Mix the bread crumbs, Parmesan and teaspoon of herbes de Provence. Add a tablespoon of olive oil, then toss and rub it in with your fingers to coat the crumbs but keep them loose. Sprinkle the crumbs evenly over the vegetables and drizzle remaining oil over all. Place dish in center of oven and bake for 40 minutes until vegetables are soft, the juices are bubbling, and the top is a deep golden brown. If the crumbs need more browning you can stick them under the broiler for a few moments. Serve hot directly from the baking dish.
Enjoy - this is luscious!

"The Prince Who Loved Me," by Karen Hawkins was a cute little Cinderella story. The heroine has a step-mother and two step-sisters, and a prince to fall in love with. I thought it was an adorable story.

I read the first couple of chapters, then the back of the book to see what it was supposed to be about, and thought I knew what happened. Towards the end I started to doubt myself, but in the end, I was right. Although I love this series of books, my biggest problem with this particular one is how much it lingered on the politics of the nation, and not so much on the mystery at hand.

Moist, Delicious CornbreadIt was pretty tasty. Tom was concerned that the cornbread was too crumbly, but the flavor was good, the bread was moist, and it had a tiny bit of sweetness to it, which I liked.
IngredientsDirections
- 2 eggs, beaten
- 1 c. milk
- 1/2 c. margarine, melted
- 2 c. Bisquick or other baking mix
- 1 c. sugar
- 5 T. yellow cornmeal
- Grease and flour an 8 inch square pan. Set aside. Combine the beaten eggs, milk and melted butter. Stir until well blended. In a separate bowl combine the dry ingredients. Add dry ingredients, a little at a time and stir lightly. To keep a light texture to the cornbread, don't over-stir. The batter may still be slightly lumpy. Pour into the prepared pan. Bake 30-40 minutes at 350°.

We had taken Reggie in to the vet on Monday because he hasn't been eating, and we were really worried about him. The vet said Reggie's gums were infected, and recommended having dental work done, which included days of hydration and anesthesia on the day of the actual dentistry/surgery. Considering his age - almost 16 years old - his chances were 50-50 as to whether or not he'd come out of the surgery alive. He stayed at the vet most of Monday to get hydrated, and I dropped him off yesterday for another full day of hydration, which could only increase his chances of survival. This morning, Tom took him in for his big day, and all we could do was wait. Around lunchtime, I learned that the surgery went okay, but the vet needed to keep him to see if he came out of the anesthesia all right. I left for band before Tom picked Reggie up. Now, it's up to us. We'll have to administer pain meds and antibiotics, and make sure he eats, all while keeping him warm and happy.

I was so worried that this year would be a complete waste of time, like last year. I have never been so glad to be proven wrong, I would have hated for it to be a waste of time for Mom and Dad.

We took the five hour tour, over the midnight hour, and had a few items of interest in our investigation; Officer's Kitchen - K2 meter readings, Prisoner's Barracks - nothing, Tent - nothing, Officer's Quarters - K2 meter readings, Enlisted Men's Quarters - nothing, Endecott Section - K2 meter readings, the Casemates - nothing. The whole evening, while enjoyable and nice to get out for a change, seemed a little anticlimactic. But upon further consideration, I think our encounters were more substantial than I initially thought.
Our first encounter was in the Officer's Kitchen, and there were just K2 meter readings that seemed kind of random. In the Officer's Quarters, I had one really big K2 meter reading, but it was when two people had just walked into the room. I initially figured that they hadn't turned their cell phones off, and that caused the spike on the K2 meter. There were also a few smaller blips on the meter. On to the Endecott section. Three of us in our group had simultaneous K2 meter readings that were pretty strong that continued for several minutes. They stopped after we discounted the readings. Now, after getting home and thinking about it, these K2 meter readings could have been more than we realized. If I held the K2 meter right up to my phone or to an electrical outlet, I got a really weak reading. What we got in our investigation was considerably stronger on several occasions. Knowing what I know now, I would go on another tour with more sensitivity and better questions and suggestions on how to interact with any potential spirits.

Cauldron CurryThis dish took a lot of work, but the flavor was pretty good. The curry paste smelled wonderful, and according to the comments on the website, it should be made in advance for maximum flavor. I was confused when I realized there was no actual curry in the dish, but I'm a novice at cooking, so what do I know? It definitely benefited from the lime and chiles, which I love the flavor of.
Ingredients
FOR THE CURRY PASTEFOR THE STEW
- 1 tablespoon whole coriander seeds, toasted
- 2 teaspoons whole cumin seeds, toasted
- 1 teaspoon whole black peppercorns, toasted
- 1 teaspoon coarse salt
- 3 serrano chiles, sliced
- 1/2 cup fresh cilantro
- 2 stalks fresh lemongrass, trimmed and chopped (1/2 cup)
- 8 garlic cloves, minced (1/4 cup)
- 2 scallions, chopped (1/4 cup)
- 2 tablespoons chopped peeled fresh ginger
- 2 tablespoons fresh lime juice
- 1 tablespoon finely grated lime zest (from 2 limes)
Directions
- 2 ounces spinach (1 cup)
- 1 can (14 ounces) unsweetened regular coconut milk
- 1 can (14 ounces) unsweetened light coconut milk
- 1 medium zucchini, quartered lengthwise and sliced 1 inch thick (21/4 cups)
- 12 ounces boneless, skinless chicken breasts, cut into 1-inch pieces
- 12 ounces boneless, skinless chicken thighs, cut into 1-inch pieces
- Coarse salt and freshly ground pepper
- 3/4 cup fresh basil
- Serrano chiles, thinly sliced, for garnish
- Squeamish Squash with Rice
- Lime wedges, for serving
- Make the curry paste: Grind coriander, cumin, peppercorns, and salt with a mortar and pestle, or with the bottom of a heavy skillet. Add remaining ingredients, and grind until a paste forms. (Curry paste can be refrigerated for up to 2 weeks or frozen for up to 3 months.)
- Make the stew: Puree 5 tablespoons curry paste, the spinach, and 1 cup regular coconut milk in a blender until smooth. Reserve remaining curry paste for another use.
- Bring remaining regular coconut milk and the light coconut milk to a boil in a medium Dutch oven or heavy stockpot. Reduce heat, stir in curry-spinach mixture, and simmer for 5 minutes. Add zucchini, and cook until slightly tender, about 5 minutes. Add chicken, and season with salt and pepper. Cook until zucchini is tender and chicken is cooked through, about 5 minutes. Add basil, and garnish with serrano chiles. Serve with rice and lime wedges.

The Ode to Elvis Poke CakeSadly, I made a mistake in the cake's construction. I put the Cool Whip on the cake while it was still warm, so it melted. I figured the flavor would still be there, and it was. It was definitely an interesting combination of flavors. Would I try it again? Although it wasn't bad, I think it's something I've gotten out of my system.
For the cake:Additional ingredients for the cake:
- ½ cup creamy peanut butter
- ½ cup (1 stick) butter, softened
- 4 eggs
- 1 (18.25 oz.) box Duncan Hines butter golden cake mix
- 2/3 cup water
For the glaze:
- 2 cups milk
- 1 box (3.4 oz.) Jello banana cream instant pudding and pie filling mix
- 4-5 bananas, peeled and sliced
- 1 container (8 oz.) Cool Whip, thawed
- 12-16 oz. bacon, cooked, crumbled and drained
- ¼ cup creamy peanut butter
- 5 tbsp. milk
- Preheat oven to 325° F. Spray a 9x13-in. baking pan with cooking spray and set aside.
- In a large bowl, cream the ½ cup peanut butter and butter with an electric mixer. Add eggs, one at a time, mixing until just combined. Add half of the cake mix and ⅓ cup of water. Mix until just combined. Add remaining cake mix and remaining ⅓ cup of water; mix until just combined. Pour batter evenly into the prepared baking pan. Bake for 30-35 minutes or until cake tests done. Remove from the oven and with the handle end of a wooden spoon, poke holes all over the cake. There is not a set number of holes, but you will want plenty for the pudding to fill.
- In a medium bowl, combine the instant pudding mix and milk. Pour the pudding mixture over the cake, trying to fill the holes the best you can. You may need to use the back of a spoon to help spread the pudding mix and fill the holes. Top with the sliced bananas. Evenly spread the Cool Whip over the cake. Sprinkle the crumbled bacon over the top.
- In a small microwave-safe bowl, combine the ¼ cup creamy peanut butter and 5 tbsp. milk. Microwave in 10 seconds intervals until smooth, stirring between each time. Carefully pour the mixture into a small zip-top bag and snip a small piece off one of the corners. Drizzle the peanut butter glaze over the top of the cake.
- Cover and refrigerate the cake for at least four hours before serving.


I can't tell you how weird it was, acting like a grandmother when I've never had children. It made my bag of tricks for coping rather small. Our best time bonding was picking our noses! It was still good to spend time with her.

It was nice, but I wish I would have been able to enjoy it earlier. There was a band playing German sounding music, several types of beer and wine were available - most of the beers been local craft beers celebrating Oktoberfest - and there was a food tent with barbeque pork sandwiches, bratwurst, knockwurst, potato salad, sauerkraut and rotkraut.

Like the Seafood Festival in Havre de Grace, I think I'd like to revisit it in a few years - to see what improvements have been made.

Fried Irish Cabbage with BaconI liked the dish. It may have needed a little salt, but that's an individual taste thing. Tom said it was good, and ate a big bowlful - not bad.
IngredientsDirections
- 1 (12 ounce) package bacon
- 1/4 cup bacon drippings
- 1 small head cabbage, cored and finely chopped
- ground black pepper to taste
- Cook bacon in a deep skillet over medium heat until crisp, 5 to 7 minutes. Remove bacon from skillet and drain on a paper towel-lined plate. Reserve 1/4 cup drippings in skillet.
- Cook and stir cabbage in hot bacon drippings over medium heat until cabbage wilts, 5 to 7 minutes.
- Crumble bacon over cabbage. Stir and simmer until bacon is warmed, 2 to 3 minutes. Season with black pepper.
Our half-time show was a Beatles medley. It featured our rhythm section, and I think we did pretty well.

In this formation, we formed the word "Shout" (I'm in the "S").


