Saturday, December 12, 2020

Memory Pillow

I had some leftover shirt material after making Memory Bears for my Mom and sister, so I decided to make a Memory Pillow for my brother.

So, I started out with what was left over from Dad's shirt. I'd already cut out all of the pattern pieces for the bear, so all I had was the upper part of the shirt, to include the collar, and the cuffs. With Tom's help, we decided on a layout for the pillow and after looking for pillow forms at Joann's, decided that the 12" x 16" would be perfect (a 16" x 16" pillow would have worked if I hadn't already cut the shirt up for other purposes).
I tried to look up patterns on the internet, but only found ideas of what other people have done, so I tried to put together a bunch of ideas that I liked. With the shirt having already been cut up the sides, I open it up and cut the shirt into a rectangle shape, with the collar being off center. The rectangle was 17" x 25" to allow for a seam allowance. I also fastened the button at the collar and traced the inside on a piece of fabric that would have been discarded. That was cut out with about ½ inch all around.
So, what I should have done first, but ended up doing about halfway through, was attach thc cuff. I pinned it in place and sewed it down. Next, I think, should have been attaching the collar piece. It's there so that when the shirt is placed over the pillow, you don't see the pillow through the neck. It was probably the most complicated part of this project. I also cut out the tag, which Tom was insistant on as probably being the most important part of the shirt-pillow, and sewed it onto the collar piece in the approximate place that it would be seen in if the collar piece wasn't there.
Then, I folded the shirt in half, with the wrong side out, pinned it in place and sewed up the sides. Next, the bottom was pinned and sewn. I unbuttoned the buttons, turned the shirt right side out and squeezed the pillow into the shirt. Reaching in, smoothing out some imperfections and rebuttoning the shirt completed the project.
I hope that my brother likes it!

Thursday, November 26, 2020

Brown Butter-Glazed Green Beans

Happy Thanksgiving!

I recently received the Food Network Magazine in the mail, and saw a recipe that I thought I'd like to try. With Thanksgiving approaching, and needing a vegetable dish for dinner, I decided to give the Brown Butter-Glazed Green Beans a try.

Brown Butter-Glazed Green Beans

Ingredients
  • Kosher salt
  • 1½ pounds thin green beans or haricots verts, trimmed
  • 4 tablespoons unsalted butter
  • 1 sprig oregano, plus 1½ teaspoons finely chopped oregano leaves
  • ¼ teaspoon red pepper flakes, plus more for topping
  • Flaky salt, for topping
Instructions
  1. Bring a large pot of salted water to a boil. Add the green beans and cook until crisp-tender, about 2 minutes; drain and transfer to a bowl of ice water. Let cool, then drain.
  2. Melt the butter in a large pot over medium heat. Add the oregano sprig and red pepper flakes. Cook, swirling the pot, until the butter is browned, 5 to 7 minutes. Add the green beans and ¾ teaspoon kosher salt. Continue to cook, tossing, until the green beans are glazed, 2 to 3 minutes. Discaard the oregano sprig, then add the oregano leaves to the pot and toss. Top with flaky salt and more red pepper flakes.
I thought that the dish was good, but I would have liked it to have more browned butter flavor. Tom, on the other hand, thought that the beans tasted funny - even the raw one I tried to get him to eat earlier in the day.

Wednesday, November 25, 2020

Chicken Cream Cheese Croissants

Last week, I was looking for something to do with chicken, and came across this recipe. I had tonight off, so I gave it a try.

Chicken Cream Cheese Croissants

Ingredients
  • 2 cups shredded chicken, see recipe below
  • 2 pop cans croissants
  • 1 8 oz cream cheese, softened
  • 1 bunch green onions
  • ¼ cup bell pepper, chopped and diced
  • ½ tsp salt
  • ¼ tsp pepper
  • 2 Tbsp butter, softened
  • 2 Tbsp milk
  • 1 egg *optional
Instructions
  1. Preheat oven to 350°F.
  2. In a bowl, mix cream cheese and butter until blended. Add milk. Mixture will be chunky if cream cheese is not softened. It's okay. Add in shredded chicken, diced green onions, diced green bell pepper, salt and pepper. Mix to combine.
  3. On a cutting board, unroll one tube of croissants. They are all pre-cut, so with your fingers, pinch together the cut lines. You will be make 4 rectangles out of the 8 croissants.
  4. On each rectangle, place ¼ cup of mixture in the center of the croissant and bring corners together and pinch to close.
  5. (Optional) In a seperate bowl, whisk egg and brush egg over each croissant.
  6. Bake for 13-15 minutes until golden brown. Remove from oven and serve.
How to make Shredded Chicken
  1. Place 1 cup water or chicken broth in bottom of Instant Pot or pressure cooker
  2. Place 2 chicken breasts in Instant Pot on trivet
  3. Sprinkle salt and pepper over chicken breasts
  4. Sprinkle crushed garlic on chicken
  5. Close Instant Pot lid and check to make sure pressure valve is closed
  6. Set on Manual (Pressure Cook) High for 18 minutes
  7. Allow a 20 minute natural release
  8. Remove chicken breasts and one at a time shred chicken with forks
  9. Use in a meal, or package and freeze for later use
In order to make it more palatable for Tom, I substituted celery for the green onion. Tom said it was delicious, but he would have liked it to have more meat and less cream cheese. I would have liked it to have a little bit more flavor, but I did like how they were easy to eat - like what I would imagine a handpie to be.

Sunday, November 22, 2020

Perfect Baked Chicken Thighs

I finally decided to fix chicken for dinner tonight and didn't have the ingredients to make anything that I'd tried before, so I found a new recipe on Pinterest - Perfect Baked Chicken Thighs.

Perfect Baked Chicken Thighs

Ingredients
  • 8 bone-in, skin-on chicken thighs OR 8 boneless, skinless chicken thighs
  • Spice blend
    • 1 tsp paprika
    • 1 tsp onion powder
    • 1 tsp garlic powder
    • ½ tsp each salt & pepper
  • Optional side dish of mixed veggies
    • 1 head broccoli, chopped
    • 1 zucchini, sliced
    • 1 carrot, thinly sliced
Instructions
  • BONE-IN, SKIN-ON THIGHS
    1. Preheat oven to 425°F. Mix together spice blend in a small bowl. Pat chicken thighs dry then cover with spice blend.
    2. Line a baking sheet with parchment paper and add chicken thighs, skin facing down. Bake for 25 minutes, then flip over and broil on high for 1-2 minutes if you're looking for extra crispy skin (optional...watch closely to make sure they don't burn!) Serve and enjoy!
  • BONELESS, SKINLESS THIGHS
    1. Preheat oven to 425°F. Mix together spice blend in a small bowl. Rub chicken thighs with spice blend.
    2. Line a baking sheet with parchment paper and add chicken thighs with bottom area facing down. Bake for 12 minutes, then flip and bake 8 more minutes. Serve and enjoy!
  • IF ADDING VEGGIES
    1. Toss veggies with 1 tbsp olive oil and ½ tsp salt. Add to baking sheet with chicken about halfway through cooking time (you only want the veggies to cook for about 10-12 minutes). Remove with cooked chicken, then serve and enjoy!
I thought that they were good and Tom said that they were tasty. I served them with Brussels sprouts and Sam's Choice Mushroom Risotto - I can't believe how much Tom loves that risotto. Why? Because he says he hates mushrooms. I guess if it's chopped up into tiny pieces, it's a little less objectionable. He didn't even mind the garlic and onion in this dish, probably because it was in powder form. I guess that's the trick, huh?

Cairns

What is a cairn? It's a pile of stones and years ago I remember seeing a website that had pictures of cairns that were randomly placed along a river in a city in Europe. So, why am I talking about cairns? Back in October, when Tom and I were visiting with Mom, we went to Presque Isle State Park in Erie, PA to see the Presque Isle Lighthouse.

While there, we walked along the shore of Lake Erie for a short time.

At some point, Tom had picked up a few stones, and gave them to me to "hold on to" for him. Translate that into "Wendy is Tom's pack mule." But that made me look at the rocks on the shore. A lot of them were relatively flat and smooth-ish, and the sizes and colors were varied. I thought that I might like to create a souvenir of our time here, so I started picking up stones of various sizes and colors, with creating a cairn or two in mind - one being a Christmas gift for Mom. We brought the rocks home and Tom ran them through the dishwasher. At that point, he mixed his stones with my carefully chosen ones, and I began working on how to place the stones so that the shape of the cairns would be triangular and they would have a variety of colors. They've been sitting on the counter ever since then, and today, we decided to put them together.
After deciding on the adhesive, we disassembled the cairns and carefully used the caulking gun to place a little adhesive on each stone, then placed them back in order.

Hopefully, when the caulk drys, it will be more on the translucent side than the white side. Other than that, the project was quick and easy and it will make an inexpensive gift/souvenir.

Saturday, November 21, 2020

Feathers McGraw Stuffie

Last Christmas I got a great gift
A crochet magazine with a mark on a page
This here
This pattern right here
Can be made for someone special
Special
Did you get what I did there? I hope so, because I think it's clever. So, anyway...
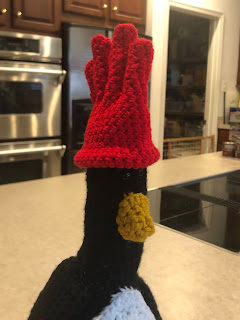
After working on a few craftie type things lately, and being "forced" to go downstairs to my extremely messy crafting area, I decided that it would be a good idea to work on the aforementioned crochet pattern. The magazine was Crochet Now (issue 48) and there was a pattern for Feathers McGraw, a beloved characater from Wallace & Gromit, in it. I went downstairs and dug out the colors of yarn that I needed for the stuffie and started crocheting for the first time in I-don't-know-how-many years.
I've never made anything like this before, so I've been unsure of everything I've done in this project. Getting back into crochet was awkward, especially since the patterrn used UK terms. I pretty much had to re-familiarize myself with everything. But, the body went okay, so my confidence level started out relatively high. The first wing went fine, too, then came the second wing. I ran out of the yarn I had used for the body and first wing, so I switched to a totally different black yarn. After finishing that wing and comparing it to the first wing, I realized there was a problem.

Did you see that? The second wing is on the left. Oh well, my confidence level plummets - I can't do anything about it now. Beak, check. Tummy patch, double check. Legs, feet, sew them together - kind of cute. My attention span is wavering, so I attached the tummy patch to the body. It looks good, so I moved on to the wings. They take a little bit of fanagaling, but the placement looks okay. Attaching the beak and legs comes next. The beak looks a little off-center, par for the course, but I'll think about that later.
I then started work on the glove-hat. It went amazingly well, I thought. Before attaching the glove-hat, I decided to remove the beak, and after placing the eyes, I re-attached the beak. It looked much better the second time, so I moved on to attaching the glove-hat. When it was all done, I think that it looks - okay.

I think that one of my nephew's Christmas gifts is complete - I hope he likes it!

Monday, November 9, 2020

Memory Bears

After working for several hours yesterday, and most of the day today, I've finally completed the memory bears that I will be giving my mother and sister for Christmas.

When my Dad died, or maybe right before we decided to put him in hospice, the Hospice lady showed us some brochures and flyers for things we could have done for memories. When Mom saw the Memory Bear flyer, she said she wanted one. I decided then and there that I wanted to make one for her. I didn't get the clothing before I left back in July, but when Tom and I visited a couple of weeks ago, I asked Mom if I could have one of Dad's shirts. She said yes, and gave me two! So, I decided to make a bear for my sister, too.
The process started out over a week ago with finding a pattern that I liked. I combed Pinterest and the internet for a free pattern. That was much more difficult than I'd like to admit. Most of the free patterns had something that I didn't like about them - I just didn't like the way that they looked. And even with the keyword "free" in the search, most of the patterns that I did like cost something. Then, I came across the HowJoyful Bear. It was a free pattern and I was able to locate a couple of helpful videos on YouTube. Win-win!
Next came making a practice bear, great advice from yet another YouTube video, since I've never done anything like this before. I found some scrap fabric, cut out the pattern pieces and started pinning them together. Then, I started sewing. Step 1 - sew the ears. Easy. Step 2 - sew the forehead to the sides of the head, with the ears in place. Okay, not too bad. Wouldn't you know it, I got hung up on the third step?!? That's when I found this video and things got much better and started falling into place. I didn't stuff the practice bear, since I didn't have any stuffing at the time, but I did almost everything else, so, after I was able to get some Poly-fil at Wal-Mart, I felt confident enough to cut into my Dad's old shirts.
I worked on both bears at the same time, cutting, piecing, pinning and sewing, and that worked out pretty well. I didn't follow the step-by-step instructions like I did with the practice bear, I ended up sewing all the smaller pieces together before larger, assembly-type things. I also decided to make a slight addition that I'd read others had made, and I stuffed the ears and tail. That added to the difficulty of assembly, but it was worth it. Attaching the front to the back was the most difficult part, since those pieces don't match up perfectly. I ended up with some pinching (not pretty) and/or ruching (which is okay to look at). Attaching the head to the body was pretty bad, too, and I think the heads are going to fall off if these bears are squeezed too hard or abused in any way. I'm thinking about adding a bow around the neck so that my horrible stitching can be hidden.
All in all, the bears are not perfect, but they were made with love and I hope that they are loved and appreciated.

Thursday, October 29, 2020

Spaghetti Squash Mac and Cheese

I had some spaghetti squash, and while browsing Pinterest, I found this recipe. I was cut from work tonight, so it was a perfect time to try it out.

Spaghetti Squash Mac and Cheese

Ingredients
Spaghetti Squash:
  • 2 small/medium spaghetti squash about 2 lbs each
  • 1 TBS olive oil
  • ½ tsp garlic salt (or to taste)
  • ¼ tsp freshly ground black pepper (or to taste)
Cheese Sauce:
  • 2 TBS butter
  • 2 TBS all-purpose flour* (or gluten-free all-purpose flour, tapioca flour or cornstarch)
  • ½ tsp sea salt
  • ¼ tsp garlic powder
  • 1 ½ cups whole milk
  • 2 ½ cups Cabot Shredded Cheddar cheese divided.
Instructions
Roast the spaghetti squash:
  1. Preheat oven to 400 degrees F.
  2. Cut both spaghetti squash in half and remove the seeds (scoop them out with a metal spoon).
  3. Brush the inside with olive oil (or spray with an olive oil spray) and sprinkle with sea salt and pepper.
  4. Place cut-side down in a baking dish.
  5. Fill baking dish ¼” with water.
  6. Cover baking dish with aluminum foil.
  7. Bake in the preheated oven for 45-60 minutes or until the squash is soft to the touch (it will compress down when pushed lightly).
  8. Remove from the oven and turn the cut-side to the top.
  9. Let cool.
  10. Use a fork to shred the spaghetti squash, being careful not to poke holes in the shell.
  11. Leave shredded spaghetti squash in the shell while you make the cheese sauce.
Make the cheese sauce:
  1. Preheat oven to 375 degrees F.
  2. In a small bowl, combine flour sea salt and garlic powder. Set aside.
  3. Melt butter in a medium saucepan over medium heat.
  4. Add dry ingredients and whisk to combine.
  5. Whisk constantly until ingredients just start to brown (about 1-2 minutes).
  6. Add milk and whisk until mixture is smooth.
  7. Continue cooking over medium-high heat until the mixture comes to a boil and starts to thicken (about 3-5 minutes).
  8. Once mixture is thick, add 2 cups of shredded cheese and whisk until the cheese is completely melted.
  9. Once cheese sauce is smooth, remove the saucepan from the heat.
Putting it together:
  1. Distribute cheese sauce evenly among the four halves of shredded spaghetti squash (with the size squashes I had, I used about ½ cup plus 2 TBS of cheese sauce for each of the four halves).
  2. Use a fork to gently stir the cheese sauce into each half of shredded spaghetti squash.
  3. Once the sauce is evenly distributed in the squash, use the fork or a spatula to smooth out the surface of each squash half.
  4. Top with remaining ½ cup of cheese and bake in preheated oven for 15 minutes, or until the cheese on the top is melted and lightly brown.
  5. Serve warm!
Tom wouldn't even try it, shocker! I thought it was okay. There wasn't a whole lot of flavor, but could it be because for cheese I used half gourmet sharp cheddar blend and half provolone?

Friday, September 11, 2020

Cottage Cheese Lasagna

I've been wanting to make a lasagna ever since Tom mentioned that he liked lasagna. Who knew? The problem is that I've never really been a lasagna fan. Whenever we had lasagna when I was a child, I hated it. But, when I started working at Tidewater Grille back in 1996, the lunch menu had a "Pasta of the Day" on it, and it was always lasagna. Usually a cheese lasagna, but sometimes a meat lasagna. Now that lasagna, I liked. Then, in later years, whenever we offered lasagna for banquets, and we servers would be allowed to eat the leftovers (don't judge, we're poor and hungry), I hated it. First, one of the chefs, I think it was Samba, would just use Stouffer's in the food service size. Then, another chef, probably Frank, would make a veggie lasagna. I eventually decided that I didn't like lasagna because of the ricotta cheese.
So, flash forward to a month or so ago. Mike, the chef who used to work at Tidewater back when we had the "Pasta of the Day," has been coming in once in a while for Happy Hour. I decided to ask him what made his lasagna so good. He said he didn't use ricotta, he used cottage cheese with egg. It was like the heavens opened up, shined a light on me and the angels sang. I bought some ingredients, did some internet research on quantities of ingredients to use and finally decided that today would be the day.

Cottage Cheese Lasagna

Ingredients:
  • 12 lasagna noodles
  • 1 lb ground beef
  • ¼ c chopped onion
  • 24 oz jar marinara sauce
  • ½ t dried oregano
  • ¾ t salt, divided
  • ¾ t pepper, divided
  • ¼ t minced garlic
  • 16 oz cottage cheese
  • 1 egg, beaten
  • ¼ c parmesan cheese
  • 1 t dried parsley
  • 2 c shredded mozzarella cheese
  • 12 slices provolone cheese
Directions:
  1. Preheat oven to 350°F. Prepare 9x13 lasagna pan by spraying with non-stick cooking spray.
  2. Prepare lasagna noodles as directed on box.
  3. Brown ground beef and onions. Drain. Return to pot, add marinara, oregano, ¼ t salt, ¼ t pepper and garlic. Stir together and continue to heat on low.
  4. Mix together cottage cheese, egg, parmesan cheese, parsley, ½ t salt, ½ t pepper and mozzarella cheese in a bowl.
  5. Assemble lasagna. Spread a small amount of meat sauce in bottom of pan and place three lasagna noodles on top. Spread ¼ of the cheese mixture over the noodles, followed by four slices of provolone, a couple of spoonfuls of meat mixture and three more noodles. Repeat two more times. Spread remaining cheese mixture (and/or meat sauce) on top of lasagna.
  6. Cover pan with aluminum foil. Bake for 40 minutes. Remove aluminum foil and bake for 10 more minutes.
I can't tell you how much I enjoyed this - and Tom liked it, too! I think I put a little too much oregano and pepper in it, but that didn't detract from the dish overall.

Sunday, August 23, 2020

Creamy Herb Chicken

Earlier this weekend, I had decided on chicken for dinner tonight and after looking through my pins on Pinterest I came across the recipe for Creamy Herb Chicken.

Creamy Herb Chicken

Ingredients For The Chicken:
  • 4 chicken breasts (pounded ½-inch thin)
  • 2 teaspoons each of onion powder and garlic powder
  • 1 teaspoon fresh chopped parsley
  • ½ teaspoon each of dried thyme and dried rosemary
  • salt and pepper, to season
For The Sauce:
  • 4 cloves garlic, minced (or 1 tablespoon minced garlic)
  • 1 teaspoon fresh chopped parsley
  • ½ teaspoon each of dried thyme and dried rosemary
  • 1 cup milk (half and half and heavy cream will also work)
  • Salt and freshly ground black pepper, to taste
  • 1 teaspoon cornstarch mixed with 1 tablespoon water, until smooth
Instructions
  1. Coat chicken breasts with the onion and garlic powders and herbs. Season generously with salt and pepper.
  2. Heat 1 tablespoon of oil a large pan or skillet over medium-high heat and cook chicken breasts until opaque and no longer pink inside (about 5 minutes each side, depending on thickness). Transfer to a plate; set aside.
  3. To the same pan or skillet, heat another 2 teaspoons of olive oil and sauté garlic, with parsley, thyme and rosemary, for about 1 minute, or until fragrant.
  4. Stir in milk (or cream); season with salt and pepper, to taste.
  5. Bring to a boil; add the cornstarch mixture to the center of the pan, quickly stirring, until sauce has thickened slightly. Reduce heat and simmer gently for a further minute to allow the sauce to thicken more.
  6. Return chicken to the skillet. Sprinkle with extra herbs if desired. Serve immediately.
Boy, was that full of flavor! Almost too much in my opinion, but Tom said he liked it, soooo, I'd say pickers can't be choosers. Another comment would be that it's a lot of food. I think a half of a chicken breast would have been adequate as a portion size.

Saturday, August 22, 2020

Preserving Rose in Resin

Do you remember this day?

Well, I do. After I took this picture, Tom pulled a rose off of the floral arrangement and gave it to me to save.

I wasn’t quite sure what I wanted to do with it. My initial thought was to preserve it with glycerine, but after some Internet research I ultimately decided to dry it and put it in a vessel in resin. I thought of using a wine glass at first, I have one that’s big enough, but it would be so top heavy that with my luck, it would topple over and break. The next best idea was a small, round bowl, and that’s what we decided to go with.
The first step was drying the rose. I think I would have preferred the method using silica gel, but I didn’t have any, so we just hung the rose upside down and let it dry for a few weeks. Then, today, we started working on the project. One of the YouTube videos that I watched made me think that it would take several days to complete the project, but after reading the instructions on the resin that I’d bought, we decided to do this project in one day. We had bought Castin’ Craft Clear Polyester Casting Resin along with the Castin' Craft Casting Catalyst. I’d decided to do five separate pours, with each pour being about a ½ inch high in the bowl, so I figured out how much resin I’d need for each pour and marked five cups along with the amount of catalyst needed for each layer.

We started by cutting the rose right where the stem met the flower.

We mixed the resin and catalyst for one minute, then poured it into the bowl.


Then we put the rose in.

It took about 30 minutes of sitting there trying to stand up the rose before the layer hardened enough for the rose to stand alone.

Then we mixed the second cup of resin and poured it over the rose; we initially tried to pipette the resin in between the petals, but we got impatient. We took some wooden skewers and tried to get the resin in between the petals – and hopefully reshape the rose a little bit (it had flattened a little while it dried).

We played with it a little bit too much, and parts of the rose started to flake off into the resin. We were able to suck some of the flakes out with the pipette, and after the resin had gelled a little, we were able to use the skewers to pull some out, but there’s still a bunch in there. We waited until the layer gelled before starting the next one.
We mixed up the third batch of resin and poured that over the rose and waited about 30 minutes, picking out flakes here and there.

The fourth and fifth batches were done one right after the other.

We needed to run some errands, so I got a shower. When I got out, Tom told me that the project was generating a huge amount of heat. It was, and the bubbles that had continued to be generated were now stationary, never having escaped the hardening of the resin. I decided that I could deal with that, it looked a little like dew so, we went out to run the errands. When we came back, we found this.

It looks like the resin cracked – more than likely from the heat. How sad is that? I had one chance to do this right and I screwed up. I will never, ever listen to Tom again! No, I probably will, but I’m so disappointed that I let him talk me in to doing the last two layers at the same time.

Sunday, August 16, 2020

Pressure Cooker Pot Roast with Vegetables

Of three options that Tom and I had planned for dinners this weekend, pot roast was selected for tonight. A brief, yet predictable, search on Pinterest yielded a recipe for Pressure Cooker Pot Roast with Vegetables.

Pressure Cooker Pot Roast with Vegetables

Ingredients
  • 3 pounds boneless beef sirloin tip roast
  • 2 tablespoons vegetable oil
  • 4 large potatoes, peeled and quartered
  • 4 large carrots, cut into 2-inch pieces
  • 1 large onion, cut into wedges
  • 2 cups water
  • 1 teaspoon beef bouillon granules
  • ½ teaspoon salt
  • ¼ teaspoon pepper
  • 3 tablespoons cornstarch
  • 3 tablespoons cold water
Directions
  1. In a pressure cooker, brown roast in oil on all sides. Add potatoes, carrots, onions and water.
  2. Close cover securely and place pressure regulator on vent pipe. Bring cooker to full pressure over high heat. Reduce heat to medium-high and cook for 40 minutes (pressure regulator should maintain a slow, steady rocking motion; adjust heat if needed).
  3. Remove from the heat and allow pressure to drop on it's own. Remove meat and vegetables and keep warm.
  4. Bring cooking juices in pressure cooker to a boil. Add bouillon, salt and pepper. Combine cornstarch and cold water until smooth, then stir into juices. Bring to a boil, cook and stir for 2 minutes or until thickened.
  5. Serve with roast and vegetables.
Now, I, of course, made a few changes. I used a chuck roast, about 1½ pounds of baby red potatoes, a tiny bit of celery (instead of carrots), a ¼ cup of diced onions, a bouillon cube and about 1½ ¼ cup measures of flour instead of cornstarch. And I seasoned the roast with the salt and pepper prior to browning it. I thought it was the best pot roast that I've made since I got this pressure cooker. There doesn't seem to be enough gravy for leftovers, so I just added another 2 cups of water, the salt, pepper and bouillon cube, and the flour to what we hadn't used, yet, and there you have it!

Saturday, August 15, 2020

Classic Southern Fried Pork Chops

Tonight's dinner was going to be pork chops, so after looking through Pinterest for some ideas, I came across a recipe for Classic Southern Fried Pork Chops that looked like it could be good.

Classic Southern Fried Pork Chops

Ingredients
  • 4 bone-in pork chops
  • 1 Tbsp Dijon mustard
  • 1 tsp granulated garlic
  • 1 tsp granulated onion
  • 1 tsp kosher salt
  • ½ tsp freshly ground black pepper
  • ½ tsp cayenne pepper plus more to taste
  • 4 bacon strips
  • ½ cup vegetable oil
  • ½ cup all-purpose flour
Instructions
  1. In a small bowl, combine granulated garlic, onion, salt, black pepper and cayenne pepper.
  2. Pat dry pork chops with a paper towel. Using your hands, rub Dijon mustard all over the pork chops.
  3. Sprinkle the spice mix and evenly rub into the chops on each side.
  4. Dredge in flour really well on both sides and set aside.
  5. Preheat a large, about 12-13-inch, heavy (cast iron is recommended) frying pan over medium-high heat.
  6. Fry the bacon strips, on both sides, until crisp and fat has rendered out. Remove the bacon and reserve for other uses.
  7. Add vegetable oil to the frying pan. Let the oil warm up to cooking temperature, about 325F.
  8. Dredge each pork chop in flour again, making sure each side is covered really well. Place in the frying pan and cook over medium heat about 4-5 minutes per side, until deep golden brown and the internal temperature of the pork reached 145F. Cooking time will depend on the thickness of the pork chops you are using.
  9. Remove pork chops, place on a platter and cover with foil and let rest for 3 minutes before serving.
Tom thought that they were good, but he wanted a crispier coating. I thought that the flavor was good, too, but the pork chops were so big that I couldn't finish mine.

Friday, July 24, 2020

Dad

Thank you for giving me life, and being in my life.

Sunday, July 19, 2020

Apple Jelly

I made quick work of this one! After completing the Peach Jam motif, I got right on the Apple Jelly in Wild Olive's Jam of the Month Club, and was able to finish it in less than eight hours. Of course, that time was mixed up with doing other things, but not much else.

I'm ready to start the next one!

Peach Jam

I can't believe how long it's been since I've completed a cross-stitch motif! But, between going back to work, kind of, and just plain forgetting that I still had this hanging, I've finally finished the Peach Jam motif in Wild Olive's Jam of the Month Club.

This one was pretty simple and the mouth turned out okay...

Friday, July 10, 2020

Lemon Butter Tilapia

When I got home from work, Tom was sitting by the picnic table, enjoying the weather and the view of our yard. I thought it would be nice to eat dinner outside and needed something quick and easy to fix for dinner, so I chose to make Baked Lemon Butter Tilapia.

Baked Lemon Butter Tilapia

Ingredients:
  • ¼ cup unsalted butter, melted
  • 3 cloves garlic, minced
  • 2 tablespoons freshly squeezed lemon juice, or more, to taste
  • Zest of 1 lemon
  • 4 (6-ounce) tilapia fillets
  • Kosher salt and freshly ground black pepper, to taste
  • 2 tablespoons chopped fresh parsley leaves
Directions:
  1. Preheat oven to 425 degrees F. Lightly oil a 9×13 baking dish or coat with nonstick spray.
  2. In a small bowl, whisk together butter, garlic, lemon juice and lemon zest; set aside.
  3. Season tilapia with salt and pepper, to taste and place onto the prepared baking dish. Drizzle with butter mixture.
  4. Place into oven and bake until fish flakes easily with a fork, about 10-12 minutes.
  5. Serve immediately, garnished with parsley, if desired.

We set up the picnic table and had a very nice dinner. I was surprised that Tom really liked the fish, I was afraid that it might have too much lemon for his taste. We also established this evening that Tom's new favorite wine is Gallo Moscato. I think that his tastes are evolving ;-)

Saturday, July 4, 2020

Potato Salad

It has become our annual tradition to have steaks on the grill with our neighbors, Mario and Sally, on July 4th. This year, in addition to steaks and roasted ears of corn, Tom requested that I make Potato Salad, so I found a recipe that looked like it would remind me of what my parents might make, and went with it.

The BEST Potato Salad

Ingredients
  • 3 pounds Yukon Gold, Russet, or red potatoes, cut into 3/4-inch cubes
  • 2 tablespoons apple cider vinegar
  • 1 1/4 cups mayonnaise
  • 1/3 cup dill pickle relish (optional)
  • 1 teaspoon celery salt
  • 1 teaspoon Dijon mustard
  • 4 hard-boiled eggs, diced
  • 2 celery stalks, diced
  • half of a small red onion, thinly sliced
  • sea salt and freshly-cracked black pepper
  • optional toppings: smoked paprika or Old Bay seasoning, chopped fresh chives, (extra) sliced hard-boiled eggs
Instructions
  1. Place the diced potatoes in a large stockpot and add enough water so that the potatoes are covered by 1 inch. Cook over medium-high heat until the water reaches a boil. Then reduce heat to medium to maintain the simmer, and continue cooking the potatoes for 5-8 minutes or until the potatoes pierce easily with a fork.
  2. Drain the potatoes in a colander. Then return the potatoes to the stockpot, drizzle evenly with the vinegar, and let the potatoes rest for 20-30 minutes or until cool enough to handle.
  3. Meanwhile, whisk together the mayo, celery salt, mustard and pickle relish in a medium bowl until evenly combined.
  4. Once the potatoes are ready to go, add in the mayo mixture, diced eggs, celery and onion. Toss gently until evenly combined.
  5. Taste and season with salt and pepper, to taste. (Also feel free to add in a tablespoon or two of pickle juice if you would like.)
  6. Transfer the potato salad to a serving bowl, cover, and refrigerate for 1-2 hours to chill.
  7. Serve chilled, or refrigerate in a sealed container for up to 3 days.
I ended up splitting the recipe in half - Tom wanted his without egg - but all else remained pretty much the same. I think everyone enjoyed it, I know I did. This recipe's definitely a keeper!

Tuesday, June 23, 2020

Cheesy Potato Kielbasa Soup

Tom wanted to have leftovers for dinner, so I decided to make a dish that I'd been wanting to make for a few weeks now - Cheesy Potato Kielbasa Soup.

Potato Kielbasa Soup

Ingredients
  • 1 tablespoon olive oil
  • 1 pound kielbasa, cut into ½ inch pieces
  • 2 garlic cloves, minced
  • ½ cup finely diced yellow onion
  • ½ cup peeled and finely diced (2 large carrots)
  • ½ cup finely sliced celery (2-3 stalks)
  • 4 cups chicken stock
  • 1½ pounds potato, cut into cubes
  • 2 cups milk
  • 2 cups shredded cheddar cheese
  • ½ cup shredded parmesan cheese
  • ½ teaspoon kosher salt
  • ¼ teaspoon black pepper
  • ¼ cup chopped parsley
Instructions
  1. Add olive oil to a Dutch oven or soup pot and heat over medium-high heat. Add the sausage and cook for 5-6 minutes, stirring frequently. Remove the sausage using a slotted spoon.
  2. Add garlic, onions, carrots, and celery and sauté for 2 minutes.
  3. Add the chicken stock and potatoes. Bring to boil and then reduce heat. Cover and cook for 15 minutes, or until the potatoes are tender.
  4. Add the cooked sausage, milk, cheddar cheese, parmesan cheese, salt, and pepper. Stir and cook on low heat 5-10 minutes longer, until the cheese has melted.
  5. Stir in parsley before serving.
This dish turned out okay. It wasn't bad, but it needed something extra. All of my cheese clumped together and didn't disperse throughout the soup, but maybe it's because I didn't use cheddar, all I had in-house was Colby-jack. I think I'd be willing to give this recipe another try, but definitely with cheddar - hopefully that will make the difference.

Saturday, June 6, 2020

Pineapple Upside-Down Cake

I'm finally getting around to using up my pineapple - I actually got another one and had to throw away the first one. So Pineapple Upside-Down Cake is next on the list.

Fresh Pineapple Upside Down Cake

YOU WILL NEED
  • 12 tablespoons (170 grams) unsalted butter, softened (1 1/2 sticks)
  • 1/2 cup (100 grams) lightly packed brown sugar
  • 2 teaspoons lime or lemon zest
  • 1/2 teaspoon ground cinnamon
  • 8 ounces (225 grams) fresh pineapple, cut into 1/2-inch-thick wedges (about 1/4 pineapple)
  • 1 cup (200 grams) granulated sugar
  • 2 large eggs, separated
  • 1 teaspoon vanilla extract
  • 2 teaspoons baking powder
  • 1/4 teaspoon kosher salt
  • 1 1/2 cups (195 grams) all-purpose flour
  • 1/2 cup (125 grams) sour cream or plain yogurt
DIRECTIONS Make Batter
  1. Position an oven rack in the lower third of the oven and heat oven to 350 degrees F.
  2. Using the back of a spoon, spread 4 tablespoons of the butter over the bottom of a 9-inch cake pan. Scatter the brown sugar and cinnamon evenly over butter. Arrange the pineapple wedges in one even layer over the butter and sugar.
  3. In a large bowl, beat the remaining 8 tablespoons of butter, granulated sugar and zest with an electric mixer on high speed until light and fluffy, 2 to 3 minutes.
  4. Add the egg yolks and vanilla and beat until smooth. Scrape the sides and bottom of the bowl then mix in the baking powder and salt.
  5. Mix in a third of the flour mixture until only a few streaks of flour remain then mix in the remaining flour. Add the egg whites and sour cream and mix just until smooth.
To Finish
  1. Spoon cake batter on top of the pineapple and spread into an even layer. Bake for 35 to 40 minutes or until a toothpick inserted in the center of the cake comes out clean.
  2. Cool cake in the pan for 5 minutes then run a knife around the edges and invert it onto a plate to cool. If some pineapple slices stick to the pan, use a spatula to transfer them back on top of the cake and spread a little of the gooey brown sugar sauce over them to cover it up.
  3. Serve warm or at room temperature. Refrigerate leftover cake up to 3 days. You can also rewarm slices in the microwave for about 10 seconds.
Tom and I agree, the flavor is good, but the cake is really dense. Could I have over-mixed it? Perhaps. Is my baking powder old? Definitely. I'll move on to another recipe.

Saturday, May 30, 2020

Classic Slow Cooker Pot Roast

A few days ago, I'd decided to make a pot roast for the weekend, but then the governor of our state decreed that restaurants can open with outdoor seating only! Good news for my pocketbook, bad news for my dinner plans. I've been working on restaurant stuff in my free time for the past few days, so I haven't had time to cook, and I didn't want Tom to suffer unduly. It was also up in the air about whether or not I'd be working all day, so I decided to fix this dish - a Classic Slow Cooker Pot Roast.

Classic Slow Cooker Pot Roast

Ingredients
  • 1 3-5 pound Chuck Roast
  • salt and pepper
  • 1 c. beef broth
For the Rub
  • 1 T. Kosher salt
  • 1½ tsp. black peppercorns (multi-colored is fine, too)
  • 1 T. fresh rosemary or 1 tsp. dried
  • 1 T. fresh thyme or 1 tsp. dried
  • 2 garlic cloves
For the Gravy
  • 2 Tbsp. cornstarch
  • salt and pepper to taste
Instructions
  1. Searing the roast in this recipe is optional. You can read about the pros and cons of searing the roast in this post.
  2. To sear the roast, heat a heavy duty pan over medium high heat. Add enough olive oil to cover the bottom of the pan. While the pan is heating, pat the roast dry with paper towels. Season it with salt and pepper. Set the roast in the hot pan and let it sear until it isn't stuck to the pan. Flip and repeat the searing process until all of the sides are seared. Remove the roast from the pan and set it on a plate.
  3. While the roast is searing, make the rosemary rub. Chop herbs, mince garlic and crush peppercorns.
  4. To crush peppercorns, add them to a sealable bag and whack them with a rolling pin. You could also put them in a food processor. Combine kosher salt, crushed peppercorns, garlic, and herbs.
  5. Rub a little olive oil over the roast. It will help the rub to stick to the roast. Sprinkle rub over the roast, using fingers to gently press into the roast.
  6. Set the roast in the slow cooker. Add beef broth to the slow cooker, being careful not to pour it directly on the roast, washing the seasoning off.
  7. At this point you can either refrigerate the roast until you are ready to cook it or you may cook it immediately.
  8. Cook roast in slow cooker on high for 6-8 hours, or on low 8-10 hours.
  9. Remove roast from slow cooker and let it rest for 5 minutes. It will easily shred when pulled apart with two forks. Serve immediately. Store leftovers in the refrigerator in an airtight container.
  10. To make gravy, add cornstarch and 1/4 cup water to a sauce pan. Whisk until smooth. Using a baster remove drippings from the roast and add them to the saucepan. If you need more liquid you can add additional beef broth. Cook over medium heat, whisking constantly until desired consistency.
What I thought was great was the advice about preparing this ahead of time and refrigerating overnight. I forget that I can do that, so it was perfect for my day! I used the size of roast that I had, close to 2½ pounds, but left everything else the same. Suffice to say, I thought it was a little too salty and Tom thought that it was a little too peppery. Either way, Tom said it was excellent and I thought it was very flavorful.