Thursday, November 26, 2020

Brown Butter-Glazed Green Beans

Happy Thanksgiving!

I recently received the Food Network Magazine in the mail, and saw a recipe that I thought I'd like to try. With Thanksgiving approaching, and needing a vegetable dish for dinner, I decided to give the Brown Butter-Glazed Green Beans a try.

Brown Butter-Glazed Green Beans

Ingredients
  • Kosher salt
  • 1½ pounds thin green beans or haricots verts, trimmed
  • 4 tablespoons unsalted butter
  • 1 sprig oregano, plus 1½ teaspoons finely chopped oregano leaves
  • ¼ teaspoon red pepper flakes, plus more for topping
  • Flaky salt, for topping
Instructions
  1. Bring a large pot of salted water to a boil. Add the green beans and cook until crisp-tender, about 2 minutes; drain and transfer to a bowl of ice water. Let cool, then drain.
  2. Melt the butter in a large pot over medium heat. Add the oregano sprig and red pepper flakes. Cook, swirling the pot, until the butter is browned, 5 to 7 minutes. Add the green beans and ¾ teaspoon kosher salt. Continue to cook, tossing, until the green beans are glazed, 2 to 3 minutes. Discaard the oregano sprig, then add the oregano leaves to the pot and toss. Top with flaky salt and more red pepper flakes.
I thought that the dish was good, but I would have liked it to have more browned butter flavor. Tom, on the other hand, thought that the beans tasted funny - even the raw one I tried to get him to eat earlier in the day.

Wednesday, November 25, 2020

Chicken Cream Cheese Croissants

Last week, I was looking for something to do with chicken, and came across this recipe. I had tonight off, so I gave it a try.

Chicken Cream Cheese Croissants

Ingredients
  • 2 cups shredded chicken, see recipe below
  • 2 pop cans croissants
  • 1 8 oz cream cheese, softened
  • 1 bunch green onions
  • ¼ cup bell pepper, chopped and diced
  • ½ tsp salt
  • ¼ tsp pepper
  • 2 Tbsp butter, softened
  • 2 Tbsp milk
  • 1 egg *optional
Instructions
  1. Preheat oven to 350°F.
  2. In a bowl, mix cream cheese and butter until blended. Add milk. Mixture will be chunky if cream cheese is not softened. It's okay. Add in shredded chicken, diced green onions, diced green bell pepper, salt and pepper. Mix to combine.
  3. On a cutting board, unroll one tube of croissants. They are all pre-cut, so with your fingers, pinch together the cut lines. You will be make 4 rectangles out of the 8 croissants.
  4. On each rectangle, place ¼ cup of mixture in the center of the croissant and bring corners together and pinch to close.
  5. (Optional) In a seperate bowl, whisk egg and brush egg over each croissant.
  6. Bake for 13-15 minutes until golden brown. Remove from oven and serve.
How to make Shredded Chicken
  1. Place 1 cup water or chicken broth in bottom of Instant Pot or pressure cooker
  2. Place 2 chicken breasts in Instant Pot on trivet
  3. Sprinkle salt and pepper over chicken breasts
  4. Sprinkle crushed garlic on chicken
  5. Close Instant Pot lid and check to make sure pressure valve is closed
  6. Set on Manual (Pressure Cook) High for 18 minutes
  7. Allow a 20 minute natural release
  8. Remove chicken breasts and one at a time shred chicken with forks
  9. Use in a meal, or package and freeze for later use
In order to make it more palatable for Tom, I substituted celery for the green onion. Tom said it was delicious, but he would have liked it to have more meat and less cream cheese. I would have liked it to have a little bit more flavor, but I did like how they were easy to eat - like what I would imagine a handpie to be.

Sunday, November 22, 2020

Perfect Baked Chicken Thighs

I finally decided to fix chicken for dinner tonight and didn't have the ingredients to make anything that I'd tried before, so I found a new recipe on Pinterest - Perfect Baked Chicken Thighs.

Perfect Baked Chicken Thighs

Ingredients
  • 8 bone-in, skin-on chicken thighs OR 8 boneless, skinless chicken thighs
  • Spice blend
    • 1 tsp paprika
    • 1 tsp onion powder
    • 1 tsp garlic powder
    • ½ tsp each salt & pepper
  • Optional side dish of mixed veggies
    • 1 head broccoli, chopped
    • 1 zucchini, sliced
    • 1 carrot, thinly sliced
Instructions
  • BONE-IN, SKIN-ON THIGHS
    1. Preheat oven to 425°F. Mix together spice blend in a small bowl. Pat chicken thighs dry then cover with spice blend.
    2. Line a baking sheet with parchment paper and add chicken thighs, skin facing down. Bake for 25 minutes, then flip over and broil on high for 1-2 minutes if you're looking for extra crispy skin (optional...watch closely to make sure they don't burn!) Serve and enjoy!
  • BONELESS, SKINLESS THIGHS
    1. Preheat oven to 425°F. Mix together spice blend in a small bowl. Rub chicken thighs with spice blend.
    2. Line a baking sheet with parchment paper and add chicken thighs with bottom area facing down. Bake for 12 minutes, then flip and bake 8 more minutes. Serve and enjoy!
  • IF ADDING VEGGIES
    1. Toss veggies with 1 tbsp olive oil and ½ tsp salt. Add to baking sheet with chicken about halfway through cooking time (you only want the veggies to cook for about 10-12 minutes). Remove with cooked chicken, then serve and enjoy!
I thought that they were good and Tom said that they were tasty. I served them with Brussels sprouts and Sam's Choice Mushroom Risotto - I can't believe how much Tom loves that risotto. Why? Because he says he hates mushrooms. I guess if it's chopped up into tiny pieces, it's a little less objectionable. He didn't even mind the garlic and onion in this dish, probably because it was in powder form. I guess that's the trick, huh?

Cairns

What is a cairn? It's a pile of stones and years ago I remember seeing a website that had pictures of cairns that were randomly placed along a river in a city in Europe. So, why am I talking about cairns? Back in October, when Tom and I were visiting with Mom, we went to Presque Isle State Park in Erie, PA to see the Presque Isle Lighthouse.

While there, we walked along the shore of Lake Erie for a short time.

At some point, Tom had picked up a few stones, and gave them to me to "hold on to" for him. Translate that into "Wendy is Tom's pack mule." But that made me look at the rocks on the shore. A lot of them were relatively flat and smooth-ish, and the sizes and colors were varied. I thought that I might like to create a souvenir of our time here, so I started picking up stones of various sizes and colors, with creating a cairn or two in mind - one being a Christmas gift for Mom. We brought the rocks home and Tom ran them through the dishwasher. At that point, he mixed his stones with my carefully chosen ones, and I began working on how to place the stones so that the shape of the cairns would be triangular and they would have a variety of colors. They've been sitting on the counter ever since then, and today, we decided to put them together.
After deciding on the adhesive, we disassembled the cairns and carefully used the caulking gun to place a little adhesive on each stone, then placed them back in order.

Hopefully, when the caulk drys, it will be more on the translucent side than the white side. Other than that, the project was quick and easy and it will make an inexpensive gift/souvenir.

Saturday, November 21, 2020

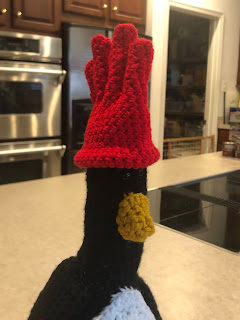
Feathers McGraw Stuffie

Last Christmas I got a great gift
A crochet magazine with a mark on a page
This here
This pattern right here
Can be made for someone special
Special
Did you get what I did there? I hope so, because I think it's clever. So, anyway...
After working on a few craftie type things lately, and being "forced" to go downstairs to my extremely messy crafting area, I decided that it would be a good idea to work on the aforementioned crochet pattern. The magazine was Crochet Now (issue 48) and there was a pattern for Feathers McGraw, a beloved characater from Wallace & Gromit, in it. I went downstairs and dug out the colors of yarn that I needed for the stuffie and started crocheting for the first time in I-don't-know-how-many years.
I've never made anything like this before, so I've been unsure of everything I've done in this project. Getting back into crochet was awkward, especially since the patterrn used UK terms. I pretty much had to re-familiarize myself with everything. But, the body went okay, so my confidence level started out relatively high. The first wing went fine, too, then came the second wing. I ran out of the yarn I had used for the body and first wing, so I switched to a totally different black yarn. After finishing that wing and comparing it to the first wing, I realized there was a problem.

Did you see that? The second wing is on the left. Oh well, my confidence level plummets - I can't do anything about it now. Beak, check. Tummy patch, double check. Legs, feet, sew them together - kind of cute. My attention span is wavering, so I attached the tummy patch to the body. It looks good, so I moved on to the wings. They take a little bit of fanagaling, but the placement looks okay. Attaching the beak and legs comes next. The beak looks a little off-center, par for the course, but I'll think about that later.
I then started work on the glove-hat. It went amazingly well, I thought. Before attaching the glove-hat, I decided to remove the beak, and after placing the eyes, I re-attached the beak. It looked much better the second time, so I moved on to attaching the glove-hat. When it was all done, I think that it looks - okay.

I think that one of my nephew's Christmas gifts is complete - I hope he likes it!

Monday, November 9, 2020

Memory Bears

After working for several hours yesterday, and most of the day today, I've finally completed the memory bears that I will be giving my mother and sister for Christmas.

When my Dad died, or maybe right before we decided to put him in hospice, the Hospice lady showed us some brochures and flyers for things we could have done for memories. When Mom saw the Memory Bear flyer, she said she wanted one. I decided then and there that I wanted to make one for her. I didn't get the clothing before I left back in July, but when Tom and I visited a couple of weeks ago, I asked Mom if I could have one of Dad's shirts. She said yes, and gave me two! So, I decided to make a bear for my sister, too.
The process started out over a week ago with finding a pattern that I liked. I combed Pinterest and the internet for a free pattern. That was much more difficult than I'd like to admit. Most of the free patterns had something that I didn't like about them - I just didn't like the way that they looked. And even with the keyword "free" in the search, most of the patterns that I did like cost something. Then, I came across the HowJoyful Bear. It was a free pattern and I was able to locate a couple of helpful videos on YouTube. Win-win!
Next came making a practice bear, great advice from yet another YouTube video, since I've never done anything like this before. I found some scrap fabric, cut out the pattern pieces and started pinning them together. Then, I started sewing. Step 1 - sew the ears. Easy. Step 2 - sew the forehead to the sides of the head, with the ears in place. Okay, not too bad. Wouldn't you know it, I got hung up on the third step?!? That's when I found this video and things got much better and started falling into place. I didn't stuff the practice bear, since I didn't have any stuffing at the time, but I did almost everything else, so, after I was able to get some Poly-fil at Wal-Mart, I felt confident enough to cut into my Dad's old shirts.
I worked on both bears at the same time, cutting, piecing, pinning and sewing, and that worked out pretty well. I didn't follow the step-by-step instructions like I did with the practice bear, I ended up sewing all the smaller pieces together before larger, assembly-type things. I also decided to make a slight addition that I'd read others had made, and I stuffed the ears and tail. That added to the difficulty of assembly, but it was worth it. Attaching the front to the back was the most difficult part, since those pieces don't match up perfectly. I ended up with some pinching (not pretty) and/or ruching (which is okay to look at). Attaching the head to the body was pretty bad, too, and I think the heads are going to fall off if these bears are squeezed too hard or abused in any way. I'm thinking about adding a bow around the neck so that my horrible stitching can be hidden.
All in all, the bears are not perfect, but they were made with love and I hope that they are loved and appreciated.